
![12 Amazing SUP Yoga Poses You Should Try! [INFOGRAPHIC]](https://www.whichinflatable.com/wp-content/uploads/2016/07/Best-Inflatable-SUP-Boards-Yoga-Exercises-900x525.jpg)
Checkout these 12 great Stand up Paddle board (SUP) Yoga exercises you must try. If you can stand on one foot, you CAN do yoga on the water. We have put together a little, ok big infographic showing these great yoga poses you can try on your board out in the water.
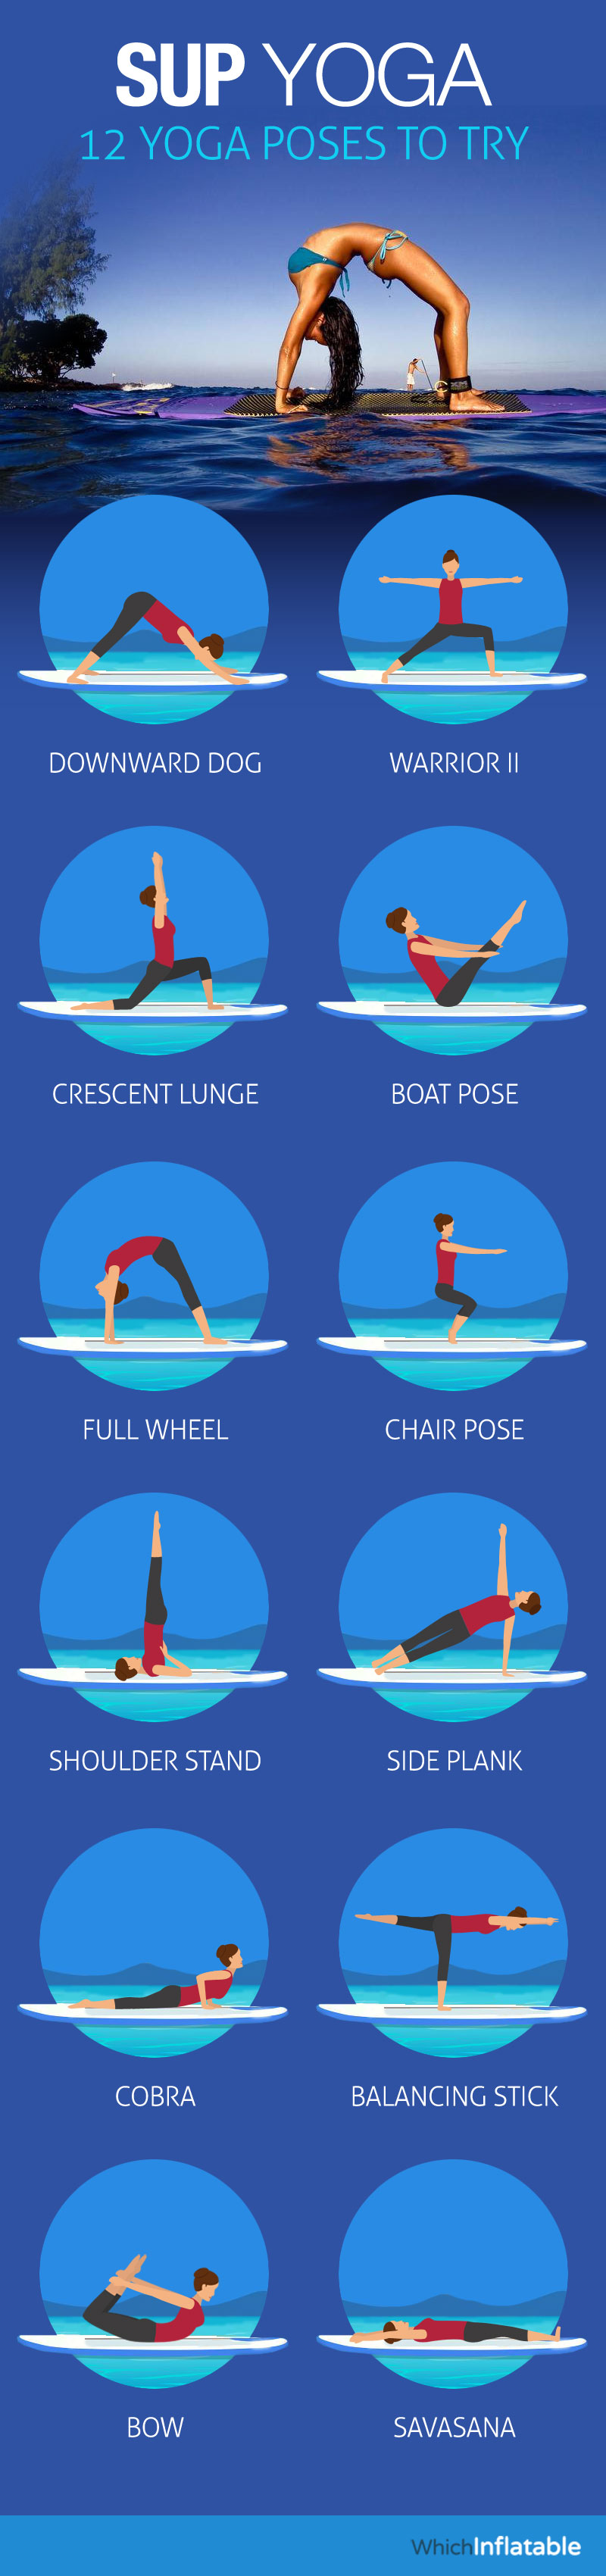
12 SUP Yoga Poses You Should Do
When it comes to exercise, Yoga has been practiced for thousands of years and has become one of the most popular forms of exercise that uses a variety of poses as a way of creating a balance of flexibility and strength in the body. It is one modality many people of all ages use to prepare their body for meditation to connect mind, body and spirit. There are twelve well recognized poses in Yoga that you can learn to do on your own.
1. The Downward-Facing Dog
The downward facing dog is one of the most popular Yoga poses. It gets its name from the way dogs stretch out their entire bodies and helps you to build strength while stretching your body. To get into the Downward-facing dog position, follow these steps.
- On your mat, get in the hands and knees position and align your wrists under your shoulders and knees under your thighs. Your middle fingers should be pointing toward the top of the mat.
- Evenly distribute your weight through each of your hands. With your toes tucked and while exhaling, begin to lift your knees off your mat to raise your buttocks toward the wall behind you.
- Slowly straighten your legs to form an A-position, but do not lock your knees.
- Press your buttocks upward, toward the ceiling while pressing your chest downward, toward the mat. You want to press the floor away from you through your hips and buttocks.
- Without walking your hands out further from your feet, stretch your spine out completely. Lifting from the outer muscles of your arms to your shoulders, press the mat away from you while lengthening then decompressing your spine.
- Tighten your thighs while rotating them inward. Hold for a count of 5-100 breaths before exhaling and slowly returning to your knees on the mat.
2. Warrior II
A leg and strength building pose, the Warrior II pose is one of three Warrior poses. To do the Warrior II pose, follow these steps.
- Start in a standing position with your arms at your side and legs shoulder-width apart.
- Exhale and move your feet approximately three feet apart and with palms down, raise your arms so they are parallel to the ground.
- Turn your left foot out to a 90 degree angle so that your toes point away from you and your right foot in slightly and align your left heel with your right heel.
- Now bend your left knee till it’s over your left ankle so that your shin becomes vertical with the floor. Bend to allow your left thigh to become parallel to the floor to create a 90 degree angle in your knee.
- Straighten your right leg and press your heel downward toward the mat.
- Now stretch your arms out and turn your head to the left to gaze out over your left hand and feel the stretch between your shoulder blades. Hold the position for 30 seconds to 1 minute then reverse the position to your right side.
3. Crescent Lunge
The Crescent lunge is a core strengthening pose to help stability and open lungs and heart. Here are the steps to achieve this pose.
- Start in standing position with one foot out in front and firmly on the ground. The knee should be bent at a 90 degree angle above the ankle. The back leg should be straight behind you with no bend to it.
- Distribute your weight so that it is on the back leg as you extend the heel down and back towards the ground.
- Scissor your inner thighs while keeping your pelvis tucked and your ribcage is lifted upwards. Tuck your chin slightly and extend your spine long. Your arms should be held straight up above your head with no bend to the elbow or wrist. Hold for 30 seconds to 1 minute then reverse pose to other side.
4. Boat Pose
For toning the abdominal muscles and strengthening the lower back, the Boat pose is one of the best Yoga positions. Here are the steps to achieve the Boat pose.
- Sit on your mat with knees bent and feet flat on the floor. Keep your hands at your side.
- Lean back just slightly and lift your shins so they are parallel to the floor. Now pull your lower back in, extend your torso and raise your chest upward.
- Lift your arms up and forward just enough so that your hands and in line with your shoulders and hold your palms inward, facing each other.
- Balance on your buttocks and slowly straighten your legs out in front of you to a 45 degree angle, creating a V-shape with your body. Hold for 30 seconds to 1 minute and slowly lower your legs and feet back to the mat.
5. Full Wheel
The Full wheel pose is a great exercise to strengthen the legs, arms and shoulder while stretching the spine and increasing its mobility. Here’s how to do it.
- While sitting on the mat with knees bent and feet close to your buttocks, reach down to make sure your hands can graze your feet. Your feet should be just parallel to each other at a hip’s distance apart.
- Now bend your arms so that your hands are under your shoulders and fingers toward your feet.
- Exhale and begin to push yourself up off the mat but do not push all the way up yet but just enough that the top of your head is resting on the mat.
- Be sure your arms are straight and still parallel as you begin to push yourself all the way up.
- Straighten your arms and push your chest wall upward so that you are in an inverted U. Hold this position for 30 seconds and slowly lower yourself back to the mat, reversing the position.
6. Chair Pose
To strengthen your buttocks and legs, the Chair pose is one of the best Yoga exercises. It is also helps with overall core strength and balance. Here are the steps to achieving the Chair pose.
- While standing on your mat, bend your knees so that your thighs are as parallel to the ground as possible. Your torso should be leaning slightly forward so your thighs are at a right angle and your knees slightly over your feet.
- Keep your thighs parallel to each other, your torso straight, and press down with your buttocks, toward the ground. Hold the position for 30 seconds to 1 minute then slowly rise back to the standing position.
7. Shoulder Stand
If you are looking to boost your metabolism, increase your circulation and help burn fat faster, the Shoulder stand pose is one Yoga position that will help you achieve it all. To get into the shoulder stand, follow these steps.
- In a seated position on the mat, extend your legs straight out in front of you with your arms relaxed on either side of your legs. Take a deep breathe, exhale, then allow yourself to fall forward over your legs with your naval touching your thighs.
- Slowly roll back onto your back and begin to reach your legs upward toward the ceiling.
- Take another deep breath, exhale and with your arms to either side of you, allow your legs to slowly descend behind you so that your toes touch the ground behind your head.
- Now bend your knees and bring them to your forehead and allow them to rest there until you feel comfortable.
- One at a time, extend a leg upward toward the ceiling while supporting your lower back with your hands. Your lower back should be lifted off the mat and lengthen your legs as high as you feel comfortable with and hold for 30 seconds to 1 minute. To come down, reverse the movements.
8. Side Plank
The Side plank is a great core and arm strengthening pose. This pose can be a bit difficult for beginners, but the following steps will help anyone achieve the Side plank.
- On the mat, shift to your left side and rest your right foot on top of your left in a stacked position.
- Position your supporting hand just in front of the aligned shoulder rather than directly underneath the aligned shoulder at a slight angle.
- Pressing the index finger of the supporting hand to the floor, firm your scapula and torso and tighten your thighs as you push your body off the floor in a complete diagonal position. You may choose to raise your other arm upward in a straight line above your body, and hold position for 30 seconds.
- To come out of the position, gently lower your body back to the mat by allowing your supporting arm to soften.
9. Cobra
For a total body stretch from neck to spine, legs and torso, the Cobra will help relieve tight muscles and increase your circulation, as well as strengthen your upper body. To achieve the Cobra pose, follow these steps.
- To start, lie in the prone position on your mat with your legs stretched out behind you and the tops of your feet and pubis firmly pressed against the mat.
- Inhale before you begin to use your arms to push your torso up off the floor. Raise your torso just high enough so that your pubis and thighs still maintain contact with the floor. Narrow-in the points of your hips, tightening them but not to the point of hardening the buttocks.
- While pushing up, firm your shoulder blades without pushing your front ribs forward yet gently puffing out the sides of the ribs. Your entire spine should be feeling an even distribution of weight. Hold the position 30 seconds to 1 minute then slowly roll back down to a supine position.
10.Balancing Stick
The Balancing stick is a popular pose to help increase your balance and core body strength. Follow these simple steps to get into the Balancing stick.
- Stand on your mat and raise your arms to the sky so that either arm is on either side of your ears and clasp your index fingers together.
- Take a step forward with your right foot and slowly transfer all your weight onto your right foot.
- Exhale and slowly bend forward while holding your balance. Your left leg should stretch out straight behind you and your arms should stretch out in front of your head. Continue bending forward until your body forms the letter T between your outstretched leg and arms. Hold the pose for 30 seconds to a minute and lower your arms and legs to starting position.
11. Bow
This position will stretch your muscles and loosen tight muscles. It is called the Bow, because your body looks like a bow with your body the bow and your arms, the strings. To achieve this position, follow these steps.
- Lie on the mat on your belly with your arms alongside your body.
- Bend your legs upward toward your buttocks, getting them as close to your buttocks as possible.
- Exhale, then with your arms, reach back and grab your ankles, not your feet. Keeping your leg muscles soft, gently pull your legs upward toward your buttocks. Breathe deep and let your shoulder blades press toward your back. This will open up your heart to let the blood flow. Your head will raise up as your legs bend higher, forming the shape of a bow.
- Hold the position for 15-30 seconds and release your ankles to return to a prone position. You can repeat the move 2-3 times.
12. Savasana
The Savasana is a great ending Yoga position for deep breathing, relaxing,and letting your muscles soften untilyour mind and body calms.
The Savasana position requires you to lie on your back on your mat. Stretch your legs out in front of you with your toes pointed out. Relax your arms by your side, palms up, and shoulders to the mat. Close your eyes. Breathe deep and let your mind and bodyrelax. Stay in this position for several minutes or until you feel comfortable enough to get up.
Which is your favorite? What do you love about SUP Yoga?
If you are looking for a good iSUP board just for yoga then check out our round up of some of the best Yoga Paddle boards on the market.
Stand Up Paddleboard (SUP) yoga is a unique combination of two different types of workouts. SUP yoga combines paddleboarding with yoga, both of which are great workouts in their own right. What exactly is SUP yoga? It is simply doing yoga on a paddle board, while floating in the water.
Benefits of SUP Yoga
There are many benefits to this exercise. Below are a few examples of the many benefits SUP Yoga has to offer. It isn’t necessary to have a lot of experience with either yoga or paddleboarding in order to enjoy this workout.
There are classes for beginners as well as those who are more advanced. Below are several reasons Stand Up Paddle Boarding yoga is a beneficial workout.
Improves Flexibility
The various poses used in yoga improve flexibility and increase mobility. Paddleboarding also calls on a lot of different muscles and help to strengthen muscles. The two exercises combined offer a wide range of motion that works different areas of the body.
Increases Circulation
An important part of yoga is focusing on breathing. This has been shown to increase circulation. Yoga also helps to reduce stress. Relaxation and stress reduction techniques help to improve circulation.
Improves Balance
Yoga poses focus on improving and maintaining balance. SUP yga works well for improving balance because it requires a lot of balance to stay on a floating board while doing yoga poses. Frequent workouts help improve balance.
Great Core Workout
Yoga poses that target the core area combines with the use of core muscles to stay afloat make for a great workout. The core muscles are very important when it comes to balance.
Refines Yoga Technique
With yoga, as well as any exercise or sport, technique improves with practice. The added paddleboard challenge assists with refining as well as improving technique.
Calming
The sense of floating on the water can have a calming affect, Yoga in itself is very relaxing and relieves stress. SUP yoga combines the peacefulness of the water with the stress reduction of regular yoga. The feeling of being close to nature by being out on the water also adds a calming effect to the workout.
Empowering
This is not an easy workout to complete. It takes hard work and patience as well as some skill. It is quite an accomplishment to be able to do these exercises.
Fun
Not only is this a great exercise for improving mobility and overall health, it is also very fun. Exercise should be enjoyable. People who enjoy their exercise program are more likely to stick with it and achieve better results. Yoga paddle boarding is certainly more fun being out on the water.
Challenging
These workouts supply not only a physical challenge, but mental as well. It takes concentration and determination to balance on a board floating on the water while doing yoga poses.
Things to Consider
Hydrate before the workout. It is always important to drink plenty of water when exercising. Because it is difficult to carry much on the paddle board and there won’t keep things on the board during the workout, most hydrating will need to be done before and after the workout.
It is important to wear appropriate attire. Form-fitting clothing such as swimsuits may work best. It is important not to have clothing that is too loose on while doing yoga. During some of the poses, loose clothing can slide around and interfere with the workout. Also, it is a good idea not to wear jewelry and/or accessories such as hats or sunglasses because they will just get in the way.
Be prepared to get wet. Because this workout takes place on the water and requires a lot of balance, it should be expected that there is a possibility of getting wet. No matter the level of experience, anyone can fall off of the board and into the water.
Keep in mind that, due to weather, there is often a limited window of time to get the workout done. In order to get the best benefit from this workout, the waters need to be mostly calm. Getting the workout in may be tricky if there is a lot of wind or it is rainy.
Wear sunscreen. This is important any time outside. No matter what the weather, when planning to be outside for extended periods of time, it is always important to protect skin from the sun.
Always check with a doctor before starting this or any other exercise program.
About the author: Chris loves the outdoors and has developed a love of gadgets and inflatable toys, from kayaking and paddle boarding to relaxing in his hot tub at home. The founder of WhichInflatable and has been the editor for 7 years.
Which Inflatable is supported by its audience. When you purchase through links on our site, we may earn an affiliate commission.